Pipeline as Code – Continuous Delivery with Jenkins 2.0
| This article appeared first on the Computas Blog. |
The big event in the Jenkins community this year is the release of Jenkins 2.0. It is backwards compatible, has an improved UI, and a more comfortable setup routine. Most importantly, the Pipeline plugin – formerly know as Jenkins Workflow- follows pre-packaged. It allows the declaration of continuous delivery pipelines as code. The code is a text script that uses a Pipeline DSL (domain-specific language) based on the Groovy programming language. This article presents a simple pipeline implementing build and release of a version of the FrameSolutions KnowledgeEditor.
The KnowledgeEditor, also referred to as KEIII or simply KE, is an Eclipse application. The releasable artifacts of KEIII are zip-files, each containing a specific variant of the product. For instance, there is a variant for each supported platform (Linux, Windows, MacOS). Maven and the Tycho maven plugin are used to built and package the application.
Important Jenkins pipeline terms are ‘node’, ‘stage’ and ‘step’. A ‘step’ is a single task for Jenkins to execute. A ‘stage’ is a logical grouping of one or several steps. A ‘node’ is a step that schedules to run the steps it contains on a local or remote agent (a master or a slave), and creates a workspace on that node. The workspace is removed once all steps contained in that node have finished executing.
The following script builds the KnowledgeEditor, and releases it if approved by a human. Comments in the code explain what happens.
// Run this on the master node:
node {
// The JDK is configured as a tool with the name 'jdk-8u77' in the Jenkins 'Global Tool Configuration'
env.JAVA_HOME="${tool 'jdk-8u77'}"
env.PATH="${env.JAVA_HOME}/bin:${env.PATH}"
// Maven is configured as a tool with the name 'M3' in the Jenkins 'Global Tool Configuration'.
def mvnHome = tool 'M3'
stage 'Checkout'
// Configure the credential in Jenkins, and use the credential's ID in the following step:
git url: 'ssh://git@gitrepo.computas.com/fs/fs-knowledge-editor.git', credentialsId: '8dbfb6d2-2549-4c6e-9a6e-994ae8797efc'
stage 'Build and tag'
// Define the version of this build.
// BASE_VERSION is defined as a build parameter in the UI definition of the job.
// Note how Groovy code is used to format the number of the current build.
def version = "${BASE_VERSION}-J2TEST-" + currentBuild.number.toString().padLeft(4,'0')
// Execute the maven command as a shell command step. On Windows, a 'bat'-step would be used instead.
sh "${mvnHome}/bin/mvn clean verify -f KnowledgeEditor/pom.xml -Dfs.version=${version}"
// Archive the zip file for access in through the Jenkins UI, or for other uses.
archive 'KnowledgeEditor/com.computas.fs.ke.products/target/products/*.zip'
// Each build is tagged with an annotated tag.
// There is no pipeline plugin for this (the Git Publisher plugin is not compatible),
// so everything has to be implemented using shell commands.
// First, we have to configure git with the mandatory user information:
sh "git config user.name \"Jenkins Pipeline\""
sh "git config user.email bob@computas.com"
// Next, tag this commit.
def msg = "\"Automatically created tag ${version}\""
sh "git tag -a -m ${msg} ${version}"
// Finally, push to the repo.
// For this to work, the ssh keys must be available in Jenkins' ~/.ssh folder
sh "git push origin ${version}"
// Send a mail to the person responsible for manual testing and release.
mail subject: 'A new version of KEIII is available for testing.',
body: 'A new version of KEIII is available for testing and approval of release.',
charset: 'utf-8',
from: 'bob@computas.com',
mimeType: 'text/plain',
to: 'fs-tester@computas.com'
stage 'Release'
// User input showing up in the Jenkins UI.
// If the timeout is reached, an exception is thrown and the build aborted.
timeout(time: 120, unit: 'SECONDS') {
input message: 'Do you want to release this version, ' + version + ', of KEIII?', ok: 'Release'
}
// A catch block could deal with the exception.
// In order to release to Nexus, deploy and access information needs to be made available in
// a maven settings file. This configuration is copied into the file defined as
// mavenSettingsFile from the corresponding managed file in Jenkins...
def mavenSettingsFile = "${pwd()}/.m2/settings.xml"
// ... using the configuration file build wrapper:
wrap([$class: 'ConfigFileBuildWrapper',
managedFiles: [
[fileId: '85adba0c-908b-4dbf-b3aa-65fe823e8984',
targetLocation: "${mavenSettingsFile}"]]]) {
// deploy to Nexus
sh "${mvnHome}/bin/mvn deploy -s ${mavenSettingsFile} -f KnowledgeEditor/pom-deploy.xml -Dfs.version=${version}"
}
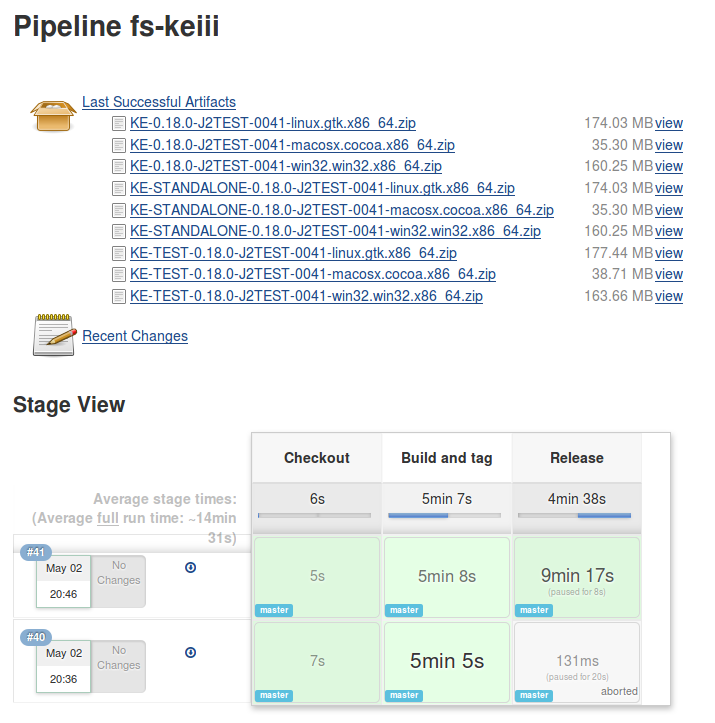
}The following screenshot shows how pipeline builds are visualized:
This is just a basic overview over what is possible with pipelines. Further topics to explore include parallel tasks, error handling, distribution to other nodes, multibranch builds, and storing the pipeline definition as a file in version control.
For more details the gentle reader is referred to Getting Started with Pipeline. A list of compatible plugins can be found here.
Judging by the reaction of the community, Jenkins 2.0 and the pipeline plugin have been eagerly awaited and the reception is positive. The plugin appears to be stable, which should come as no surprise – after all, it is based on Jenkins Workflow, earlier available only in the commercial Jenkins edition. However, it does not yet cover all the functionality provided by the abundance of Jenkins plugins. This may lead to the feeling that the code is not quite coherent: for instance, it is possible to clone branches using a predefined step, but in order to tag a commit, one has to resolve to running shell commands.
Even so, it appears to be a very attractive solution: code can be reviewed, diffed, shared, and gives basically better control and a better overview over what happens than a large number of configuration screens.
Pipeline as code and Jenkins 2.0 are certainly worth pursuing further.